 Approximate time: 1 hour |
  Level: Beginner
Reducing World Sizes In Massive Loop⚓︎
Welcome to the World Size Reduction Tutorial.
The goal here is to teach you the many techniques and tricks you can use to reduce the size of your world. Having a smaller world file means that uploading and downloading your world from the massive loop servers will be much quicker, especially for those with slower internet connections. It also helps reduce the time it takes to load into your world.
So whether your making a large open world, or a small hangout space, many of the tips in here that we will go over can be applied to help you optimize the size of your world and make it as small as possible. It's worth mentioning that most of these techniques can also be used to reduce the size of your avatars as well.
There are no Prerequisites or Files required for this tutorial.
Preface⚓︎
The most common culprit in your projects that takes up the most amount of space is Textures, next to Sounds, Meshes, and Animations. Granted this can vary depending on what kind of world you have, and the assets that you are using for it. For example say you have a world with a heavy emphasis on sound, you'll likely have alot of audio assets that can take up more space than the Meshes or Textures in your project.
Now it's important to mention that most of these procedures will definetly drop the quality of your assets. It's up to you as the developer to decide the level in which the quality of your assets will drop, but you need to be willing to compromise and balance the scale of quality over size/efficency.
We will go over each section in detail and show off some techniques and tricks to save on space. However, note that for some worlds the impact of some of these tricks can vary depending on what kind of world it is. The only certain way to know is to measure the actual size of your world after applying each technique to see the effects of each.
To determine the actual size of your world, you can do a build of your scene using the Build and Run feature inside of the Massive Loop SDK. Which builds your world file locally, and places it in your Unity Project under the name "MLSDKBuilds" where inside of it should be a folder with a GUID of your world. Using windows explorer you can check the size of that folder which will give you the exact size of your world.
To measure actual asset sizes, you can also do a test build of the scene (not using the MLSDK) straight from Unity and read the editor log that is output when a build is complete. The Unity Editor log after build, details the percentage of data taken up by your assets in the project. It also lists every asset that is in the build and it's final compressed size.
With all of that out of the way lets begin...
Reducing Texture Data⚓︎
Texture Resolution⚓︎
The simplest but most effective way to reduce texture data is to reduce the max resolution of the texture.
The larger the resolution, the more data that is needed. For example, a 1024x1024 holds 4x as much compared to a 512x512, and by extension 512x512 holds 4x as much compared to 256x256. This will have the biggest impact in influencing the quality of the texture, but also the amount of data that is needed in order to store it.
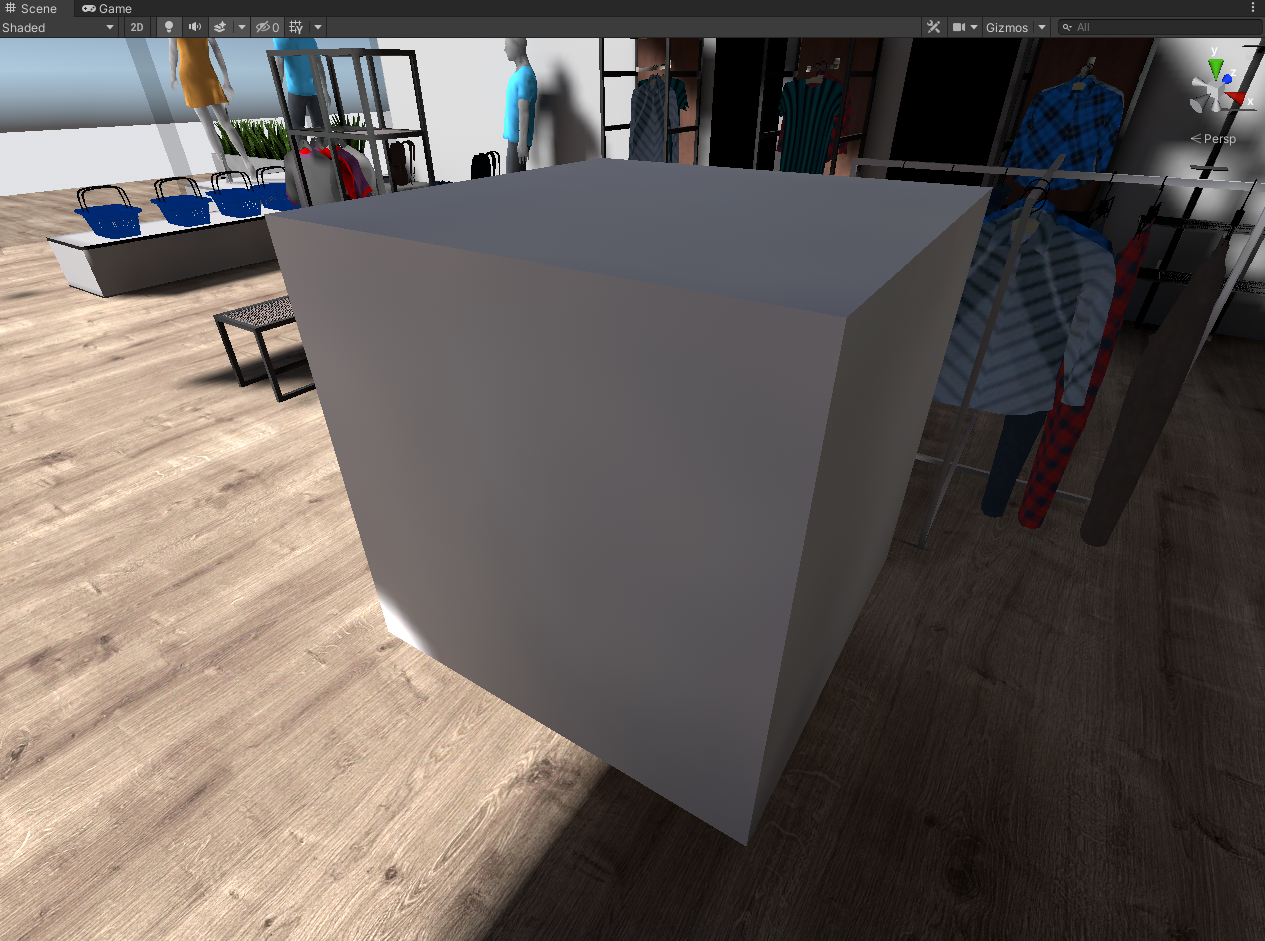
We will be looking at the "imported size" which unity shows you at the bottom of the texture preview.
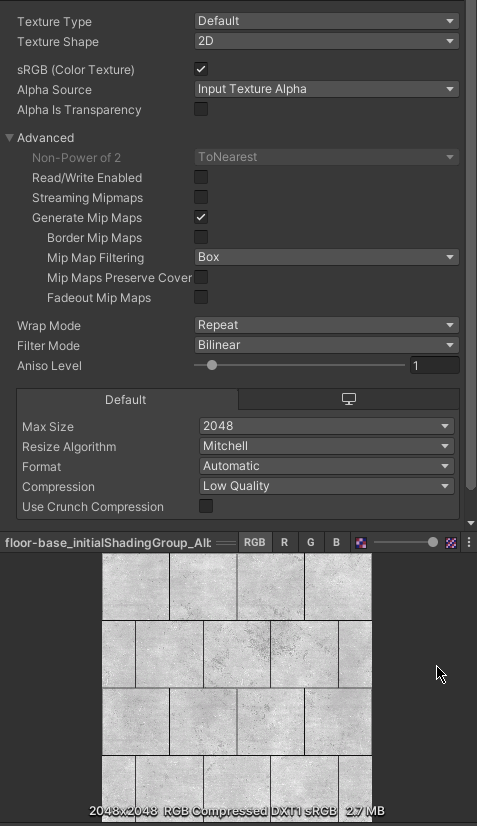
Here we have a 2048x2048 texture. Looking at the imported size the texture is 2.7 MB, but we can reduce the resolution to 1024x1024.
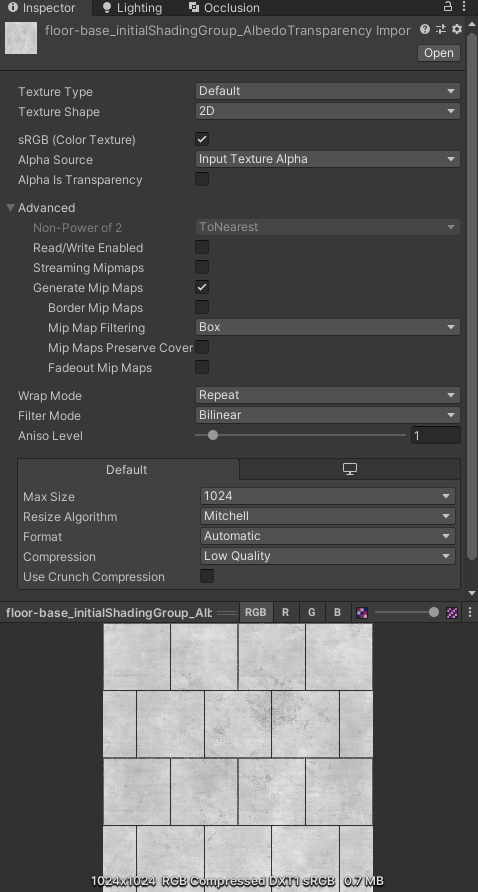
By reducing the resolution to 1024x1024, the size of the texture has now dropped to 0.7 MB (2 MB reduction).
Note
Texture resolution affects the texture data size when it is loaded in memory.
Crunch Compression⚓︎

Another way of reducing texture size is to use Crunch Compression on texture assets.
This is another way of effectively reducing the data stored by a texture on the disk without needing to change the resolution. Like adjusting the resolution, this will affect the quality of the texture.
Adjust the Compressor Quality until it's at an acceptable level (The lower it is, the smaller it will be but the quality will suffer). Depending on the texture and how its used in the scene you might be able to get away with dropping the quality to the lowest possible level.
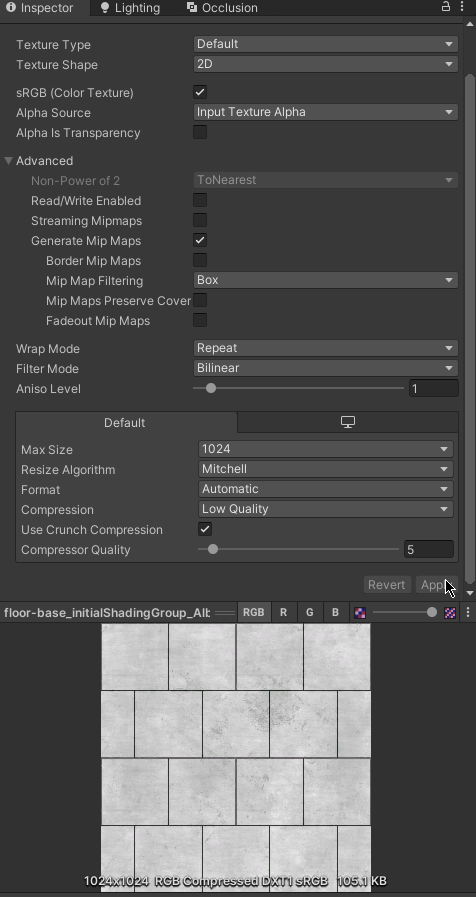
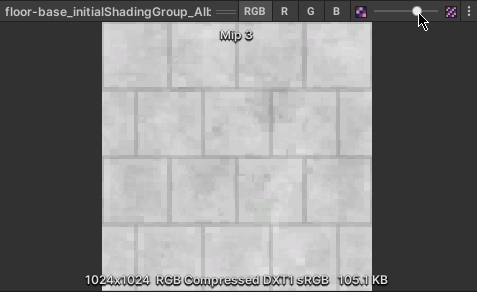
After reducing our texture resolution to 1024x1024, our initial size was 0.7 MB (700 KB roughly), and by enabling Crunch Compression and reducing the quality to 5% we were able to reduce the size to 0.1 MB (105.1 KB, 600 KB reduction).
With Crunch Compression Off...
With Crunch Compression On...
Checking the texture here and how it's used in our scene, the reduction in quality wasn't too noticeable, so we can get away with this reduction in data.
Note
Crunch Compression does not affect the texture data size when it is loaded in memory. It only affects the data when it's stored on the disk.
Mip Map Generation⚓︎
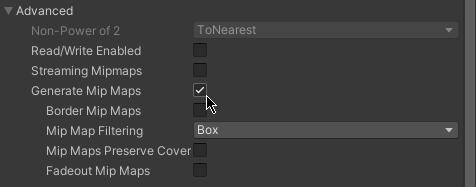
Another technique to reduce texture data is to disable Mip Map generation on textures.
Mip Maps are lower-resolution versions of the same texture stored in the same file, at a distance, these lower resolution textures are used to reduce aliasing artifacts. They can also be used in shaders creatively to get a blurrier version of the original texture.
So with the same texture asset we were using previously, reducing the texture size to 1024x1024, and enabling crunch compression, our initial texture size now is 105.1 KB. We can reduce this even further by disabling Mip Map generation.
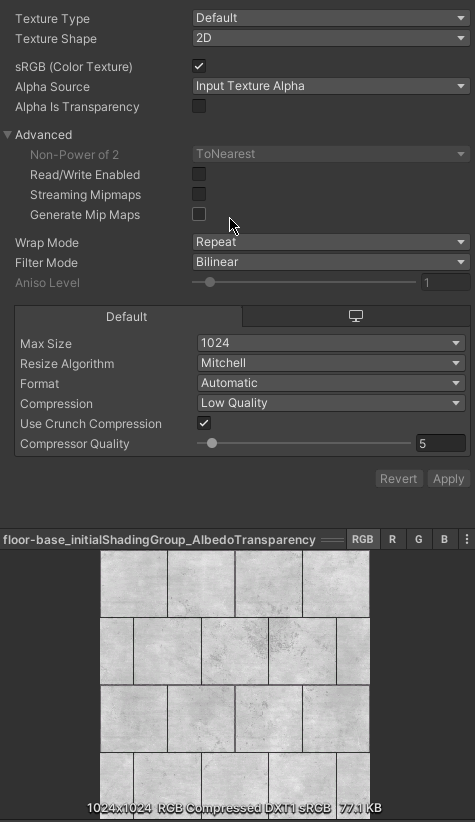
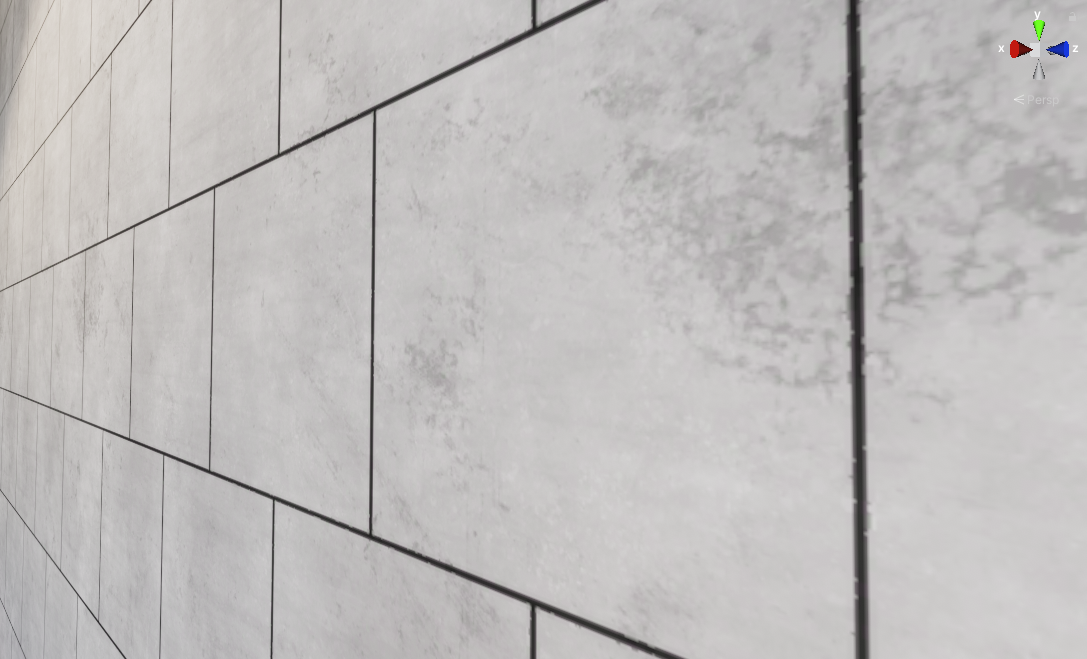
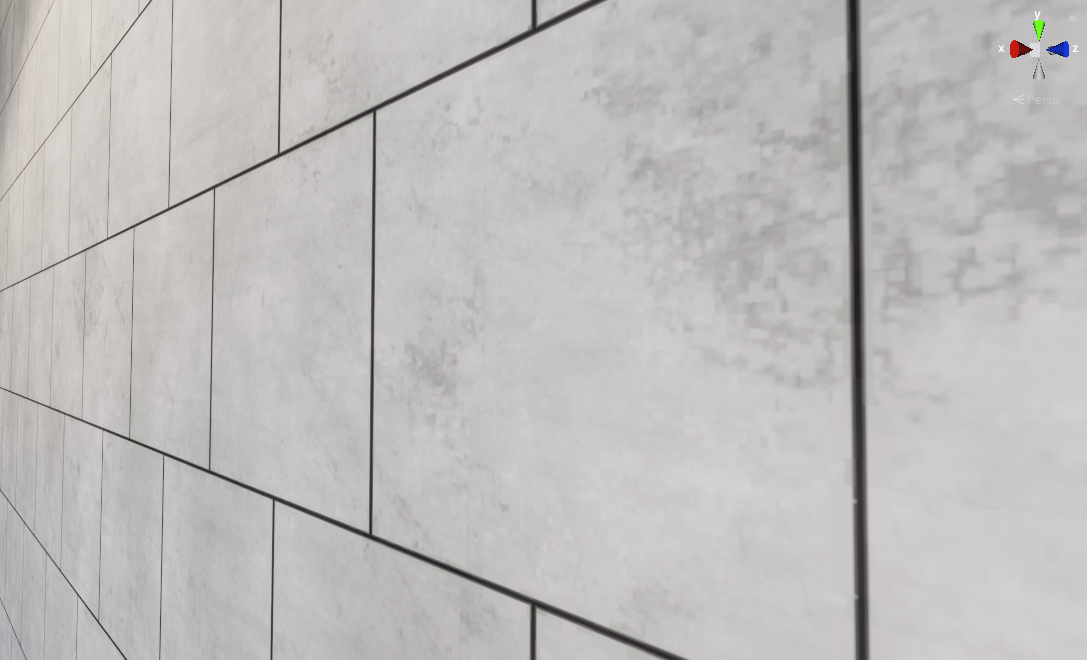
By disabling Mip Map generation, our texture size is now 77.1 KB (28 KB reduction). However, as we noted, disabling Mip Maps can introduce aliasing artifacts as shown here.
Renabling Mip Maps generation can alleviate this but the size of the texture grows...
Depending on the texture asset that you are using, and how it's used in the world, disabling Mip Map generation can be a valid way of reducing texture data to save more space. But for some textures you might not be able to get away with it.
Note
Disabling Mip Map generation also reduces the texture data size when it's loaded in memory.
Using shaders to reduce the need for additional textures.⚓︎
We can use shaders to be strategic in how many texture assets we use in our project by utilizing shaders/materials to reduce the number of textures needed.
As an example say we have an urban city enviorment, with multiple cars that drive throughout the city. Now for variations, each car has to have a different paint color. The simplest way to achieve this to paint different base color textures for each color that we want. However, by doing that we can very quickly eat up space.
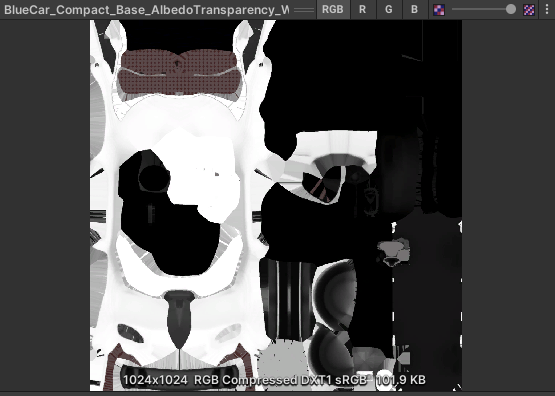
Each different car base color texture is 101.9 KB and there are 11 variations of different colors that were painted, which means there is 1120.9 KB (1.1 MB) of textures.
We can reduce the textures needed to represent different car colors by creating a shader, and an additional texture mask for the color modification of the base car color. This Color Mask is only 23.3 KB.
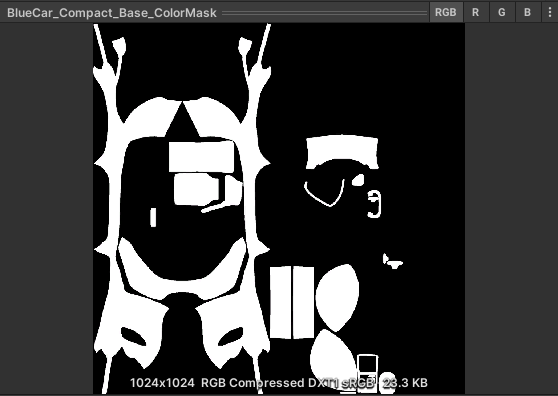
By using this in our custom shader, our combined texture data size with both the color mask and a white base color texture adds up to 125.2 KB on the disk. Much smaller than having 11 different base color textures taking up 1120.9 KB (1.1 MB), but because of that we also grant ourselves a lot more flexibility as we can have any paint color we want and even more variations of it.
Reducing Lightmap Data⚓︎
If your world is using lightmaps to either supplement real-time lighting, or using fully baked lighting to light your world, there is a high chance that the lightmaps themselves take up a lot of data regarding the world. (Sometimes lightmaps can take up more data than the rest of the assets in your project)
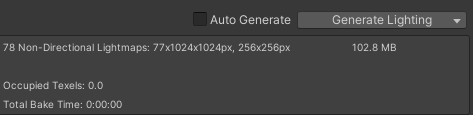
A quick way to see how much data lightmaps take up in a scene, is to open the Lighting window for the scene. On the bottom right is often listed the size of the lightmap data which can range greatly from 50MB to sometimes 300MB or more depending on the scene complexity and size. There are a few ways to reduce the size of your lightmap data.
Lightmap Resolution⚓︎
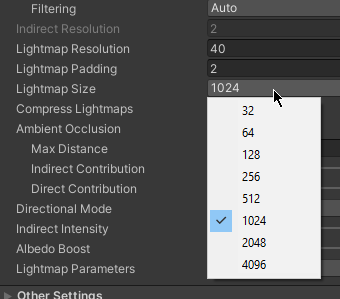
As described in the Reducing Texture Resolution section of the tutorial, the most effective way to reduce the data sorted in a lightmap texture is to reduce the resolution. Play with the resolution, and adjust it to a level that you are comfortable keeping it. This can be done by either reducing the size of the lightmap texture asset itself, or reducing the lightmap size in the lighting window and rebaking the lightmaps for the scene.
Note
The Lightmap Size field in the lighting window changes the max resolution of a lightmap.
Lightmap Mip Map Generation⚓︎
If needed, you can also reduce even more data stored by a lightmap by disabling Mip Map generation. For lightmaps disabling Mip Map is alot more forgiving and less prone to aliasing artifacts compared to other kinds of textures.
Non Directional Lightmaps⚓︎
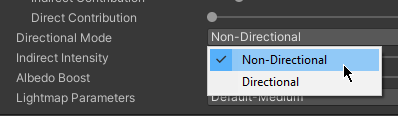
Another way to reduce the number of data lightmaps take is to bake Non-directional lightmaps.
Directional Lightmaps attempt to maintain directional information of lights, and use that to enhance the quality of the bake by shading the diffuse term using the normal map on the materials depending on the direction of incoming light.
Depending on the kind of lighting and materials a scene may have, the difference between the two modes might be small or unnoticeable. If your world does not have a lot of normal mapped materials and details, it might be worth switching to Non-directional Lightmapping to reduce the overall data stored on the disk.
Example with Directional Lightmaps...

Example with Non-Directional Lightmaps...
Lightmap Crunch Compression⚓︎
Another way to drastically reduce the size of the lightmaps is to use crunch compression.
However, before we can do that we have to change the texture format that used by the lightmaps. In unity this can be done through the Player Settings panel for your project.
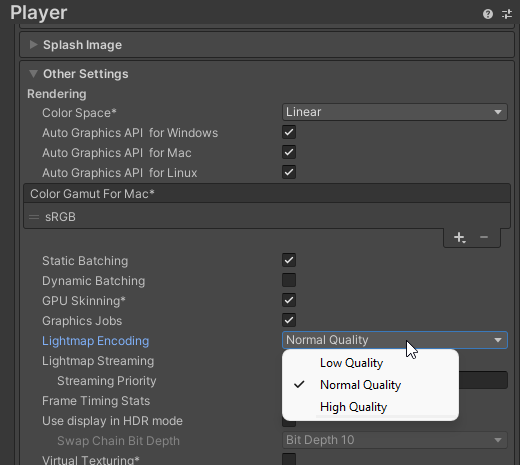
Each of these quality levels will change the encoding format of the lightmap to the following...
Note
These are the formats used on Standalone/Desktop platforms, which is the same platform that Massive Loop is currently on.
By default, Unity chooses High Quality which means that lightmaps are encoded in the BC6H format. The issue with this format is that it is not crunch compressible.
Switching to Normal Quality and Low Quality switches the format to DXT5 which compared to BC6H is slightly lower quality. However the size difference is the exact same, and even the quality difference might be unnoticable.
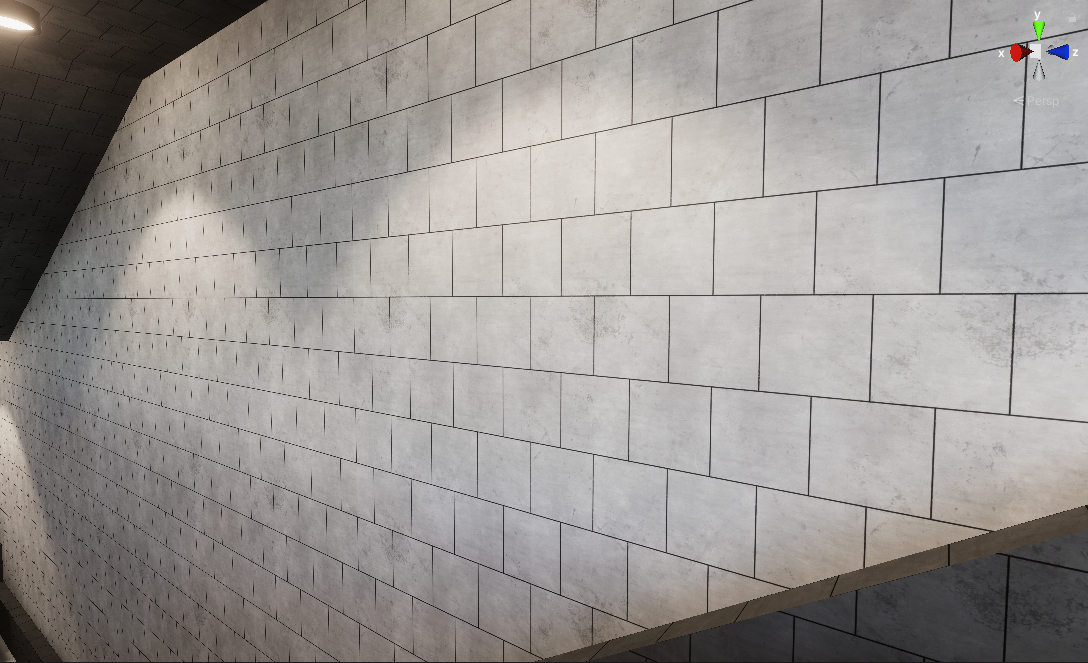
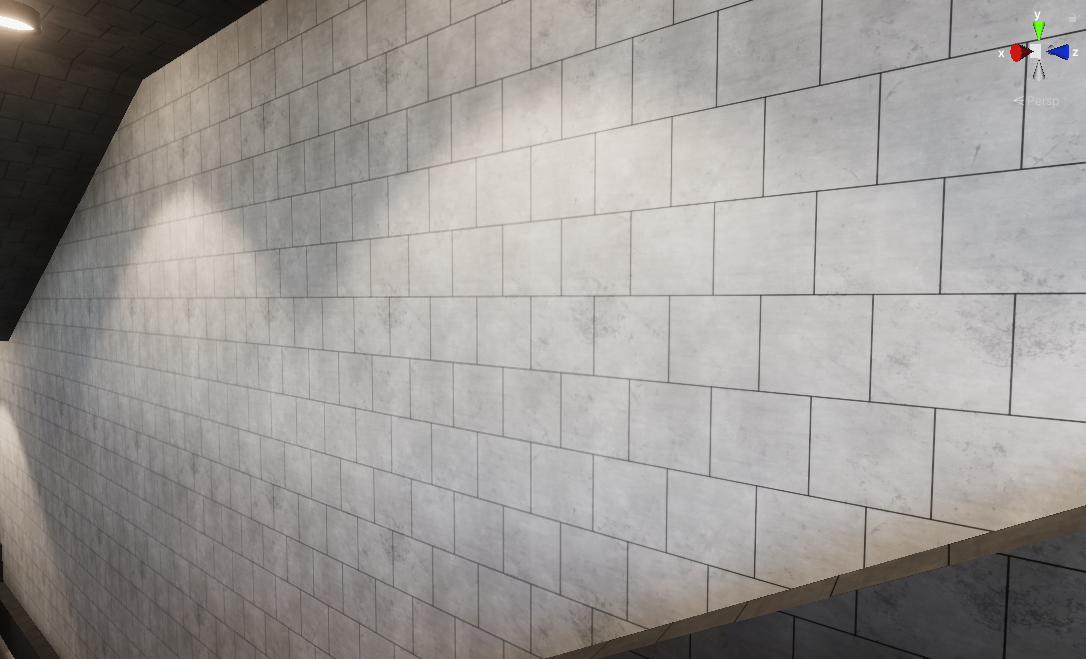
Using High Quality (BC6H) Encoding...
Using Normal Quality or Low Quality (DXT5) Encoding...

As we can see the quality difference is nearly identical, but the advantage here is that switching to these formats does allow us the abillity to use crunch compression on lightmaps unlike BC6H.
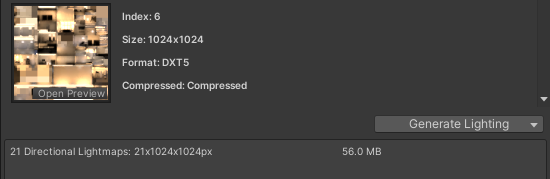
Currently the lighting data for this scene reports that the lightmaps take up 56 MB of space.
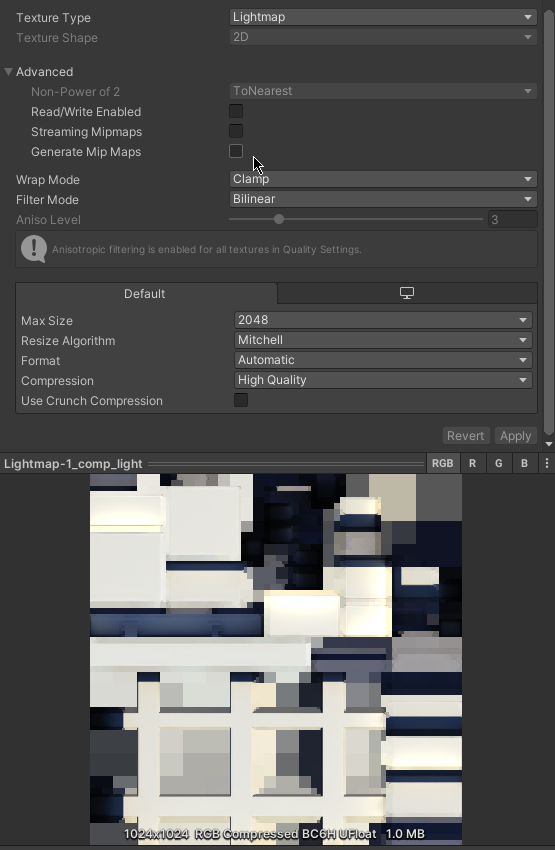
Looking at just a single 1024x1024 lightmap texture here, we can see that currently our texture is 1.3 MB.
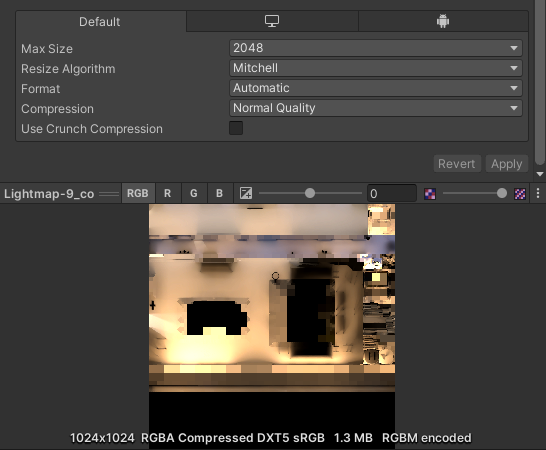
We can enable crunch compression to reduce the size even further.
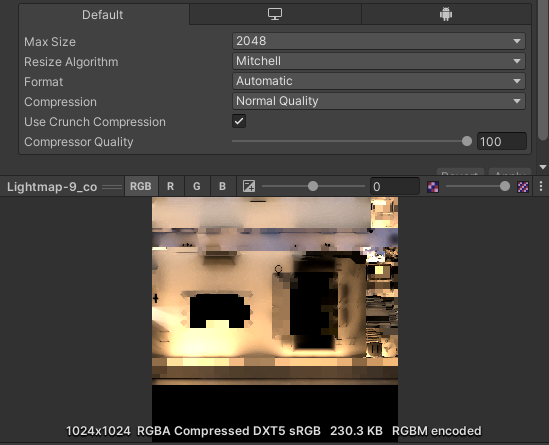
Now our texture after enabling crunch compression is 230.3 KB (1070 KB reduction).
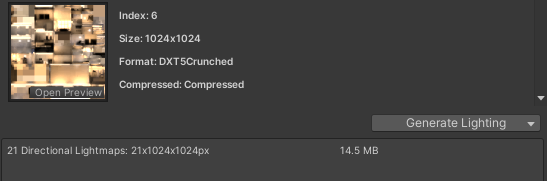
With that the lighting data for this scene after enabling crunch compression on all textures (including the directional lightmaps in this example) reports that the lightmaps are now taking up 14.5 MB (41.5 MB reduction) of space.
However, there is a caveat to doing this especially with lightmap textures...
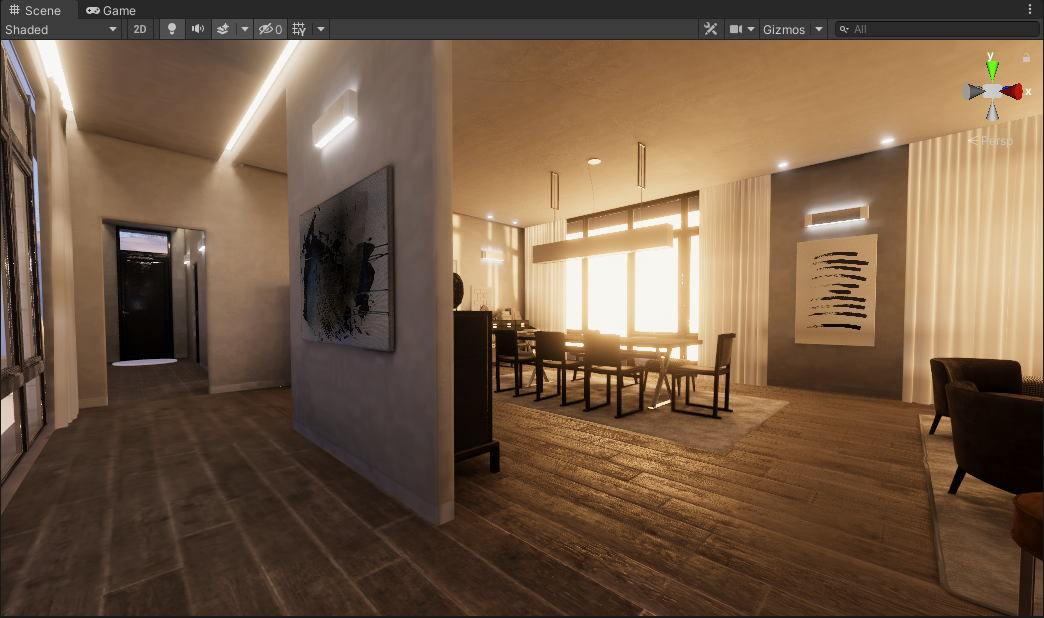
As we can see there is considerably more noise and blockiness introduced by the crunch compression. Mind you that the compressor quality level was set to 100 which is the highest. For some developers, this is right at the line of acceptable for a world.
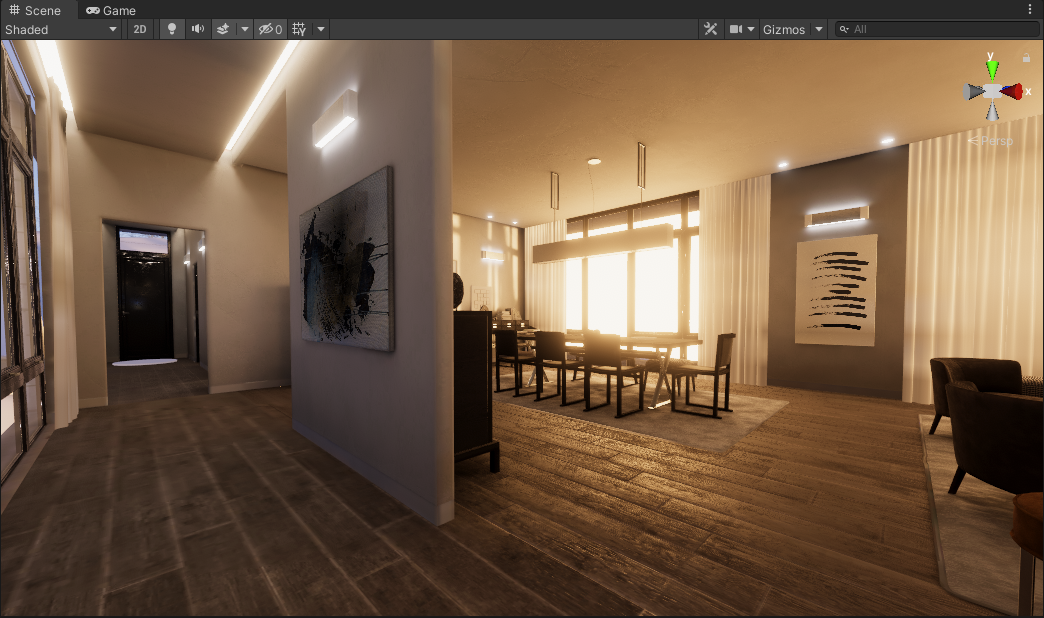
Now it's important to mention that for some worlds, the artifacts introduced by crunch compression wouldn't be much of a problem at all. For example...
This is a world that uses crunch compression on lightmaps with the compressor quality level at 100 (the same exact level used in the previous example), and the artifacts introduced by it are barely noticable due to the complexity of the scene and assets. For worlds that have alot of visual complexity, you can hide the artifacts brought on by crunch compression.
Compared to the previous examples where detail and geometry was simple and scarce, the only difference between the two examples is that one world can hide the problems brought on by crunch compression better than the other due to a higher visual complexity.
Reducing Audio Data⚓︎
The next on the list of assets that can take up a large amount of data on the disk for your project is Audio. As the various import settings and compression types are adjusted on the clip, be sure to listen to the clip in the editor to check if the quality is acceptable.
Note
The Load Type has no effect on the size of the disk for the audio clip.
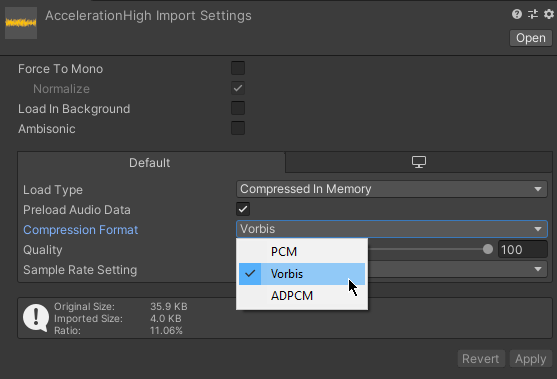
Compression Format⚓︎
The compression type that reduces the most amount of data for an audio clip is Vorbis. By default, this is usually chosen by Unity. In this example choosing Vorbis compression reduces the size of the audio clip from 35.9 KB to 4 KB.
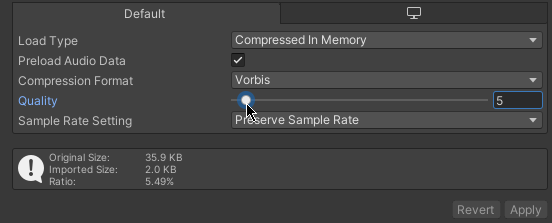
Quality⚓︎
The compression quality on the audio clip. Once again, adjust the value and listen to the clip until it's at an acceptable level. changing the quality to 5% reduced the clip size from 4 KB to 2 KB.
Depending on the length clip the difference can be large or small.
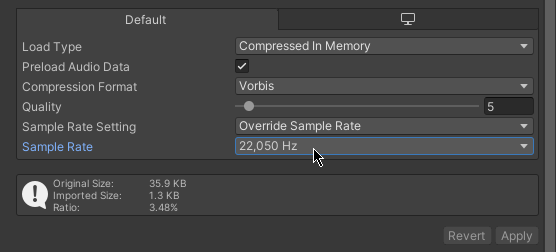
Sample Rate⚓︎
To reduce even more data that an audio clip has we can override the sample rate and choose a lower frequency.
Adjust the frequency until the quality is acceptable. Depending on the audio clip the quality difference between different sample rate frequencies can be much more noticeable than the compression quality.
In this example changing the sample rate from 44100 hz to 22050 hz reduced the size from 2 KB to 1.3 KB.
Converting to Mono⚓︎
Another way to reduce the data that an audio clip takes up is forcing it to be a mono track instead of a stereo track.
In the Unity Inspector there is a field at the top for forcing the clip to be a mono track.
Enabling this changes the imported size of the clip from 1 KB to 0.8 KB.
Note
If you wanted to its possible to reduce the size even slightly more by disabling the Normalize option with the Force To Mono option. While in these examples the difference is rather small, the Ratio as reported by Unity drops to a much smaller value meaning that the clip is indeed much smaller data size wise.
Reducing Mesh Data⚓︎
Meshes compared to Audio, Animation, and Textures takes up a smaller amount of data. With that said, depending on the project they can still take a considerable amount of size on the disk.
Mesh Compression⚓︎
A way to reduce the data a mesh asset has on the disk is to enable Mesh Compression on the import settings for the mesh. This simply reduces the precision in which the mesh data is stored on the disk.
Note
Mesh Compression has no effect on the size of the mesh in memory.
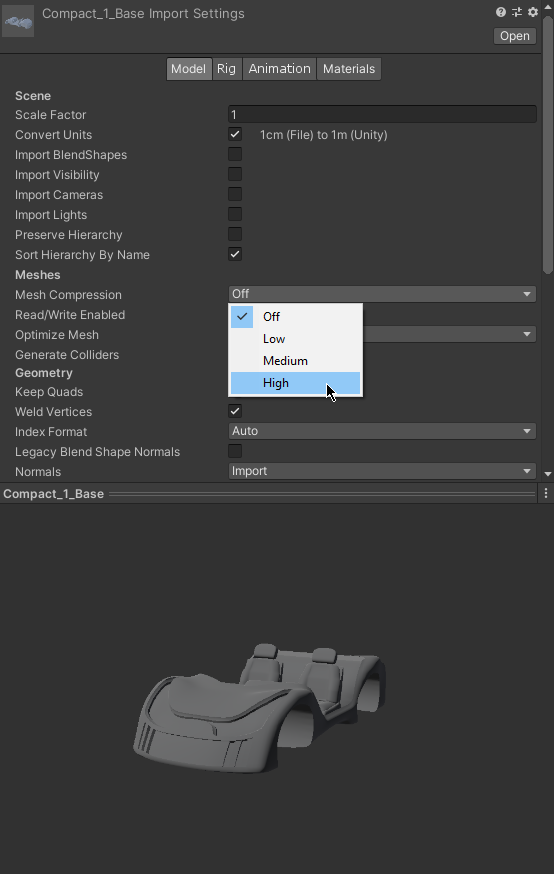
Unity has 4 different levels of mesh compression.
Off- No Mesh Compression.Low- Data is reduced by roughly 35%Medium- Data is reduced by around 46%High- Data is reduced by 54%
This will reduce the quality of the mesh, so play with the compression and set it to a level that is acceptable to you.
Mesh Compression Off...
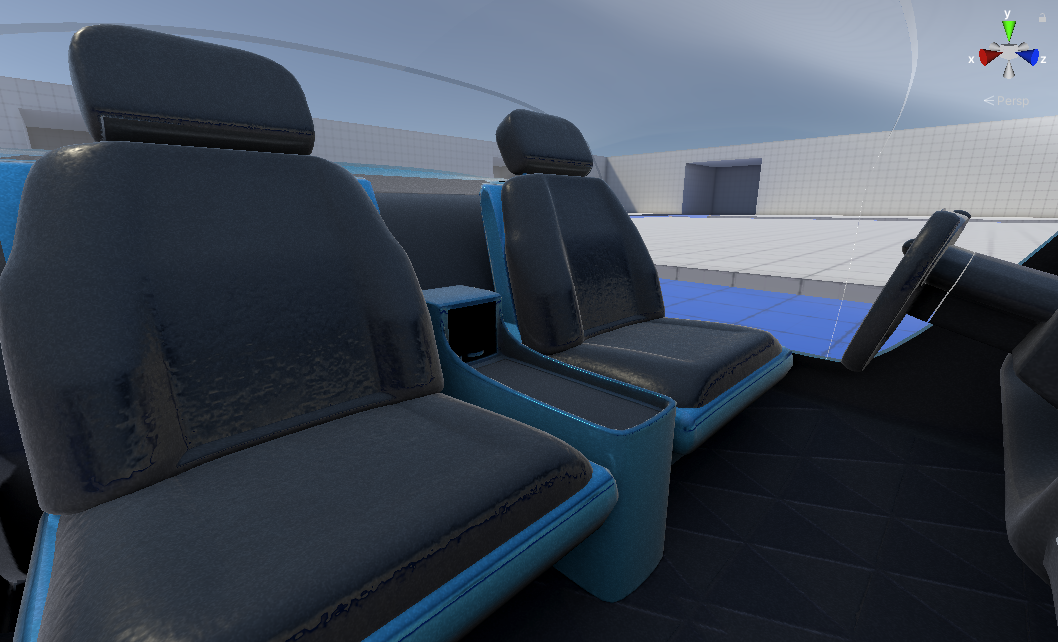
Mesh Compression High...

Mesh Compression Examples⚓︎
Because Unity does not indicate the size of the mesh in the inspector (unlike for texture and sound assets) this will have to be discovered through build testing. However, we have provided some example data that we tested here to show you the differences between the different levels.
Note
- It's worth mentioning that these are not skinned meshes with rigs or other additional embedded data.
- We also provided the original asset sizes to show that Unity optimizes the mesh even without compression when building.
Sample Project - Original Assets Sizes
- Overall Original Mesh Data Size (19 mesh assets) -
19.49 MB - Mesh 1 - Compact_1_Base.obj
6483.968 KB - Mesh 2 - Compact_1_Headlight.obj
163.84 KB - Mesh 3 - Compact_1_Glass.obj
704.512 KB
Sample Project - On Build (MESH COMPRESSION OFF)
- Overall Mesh Data Size (19 mesh assets) -
2.7 MB(100%)(87% difference between original assets) - Mesh 1 -
848.7 KB (100%)(87% difference between original asset) - Mesh 2 -
20.2 KB (100%)(88% difference between original asset) - Mesh 3 -
101.5 KB (100%)(86% difference between original asset)
Sample Project - On Build (MESH COMPRESSION ON - LOW)
- Overall Mesh Data Size (19 mesh assets) -
1.8 MB(66.67%, 33.33% difference between no compression) - Mesh 1 -
585.2 KB (68.95%) - Mesh 2 -
12.6 KB (62.38%) - Mesh 3 -
64.5 KB (63.55%)
Sample Project - On Build (MESH COMPRESSION ON - MEDIUM)
- Overall Mesh Data Size (19 mesh assets) -
1.5 MB(55.56%, 11.11% difference between low compression) - Mesh 1 -
497.1 KB (58.57%) - Mesh 2 -
10.6 KB (52.48%) - Mesh 3 -
53.8 KB (53.00%)
Sample Project - On Build (MESH COMPRESSION ON - HIGH)
- Overall Mesh Data Size (19 mesh assets) -
1.2 MB(44.44%, 11.12% difference between meduim compression) - Mesh 1 -
415.4 KB (48.95%) - Mesh 2 -
8.9 KB (44.06%) - Mesh 3 -
43.8 KB (43.15%)
Player Settings⚓︎
Additional ways to reduce the size of your world is to configure the settings in the Optimization section, found in Player Settings tab for your Unity Project.
Unity has many options in here that you can play with, however depending on your world some of these options may have a small impact or none at all.
You'll have to experiment with them but we've found in our testing that a combination of these options can reduce up to 4 MB or more from your world. To help illustrate this we've provided some example data for a world that was optimized with some of these settings tested.
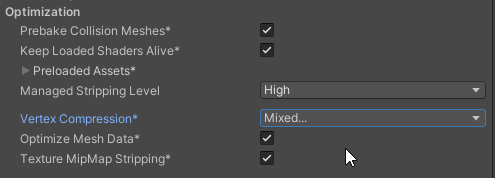
Example Data⚓︎
Original World Size: 52.5 MB (55091200 bytes)⚓︎
- Managed Stripping Level: None
- Vertex Compression: None
- Optimize Mesh Data: Off
- Texture Mip Map Stripping: Off
New World Size: 48.5 MB (50954240 bytes) [4136960 bytes, 92.491% compared to control]⚓︎
- Managed Stripping Level: High
- Vertex Compression: Texcoord 3, Texcoord 2, Texcoord 1, Texcoord 0, Color, Tangent, Normal, Position (Everything)
- Optimize Mesh Data: On
- Texture Mip Map Stripping: On
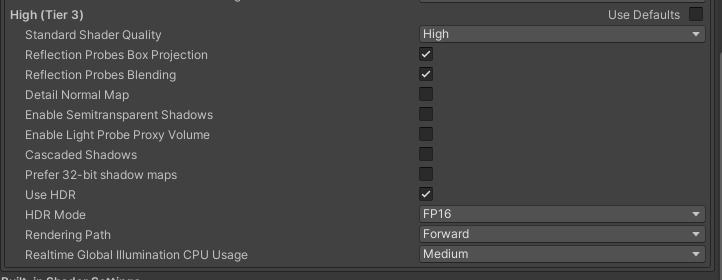
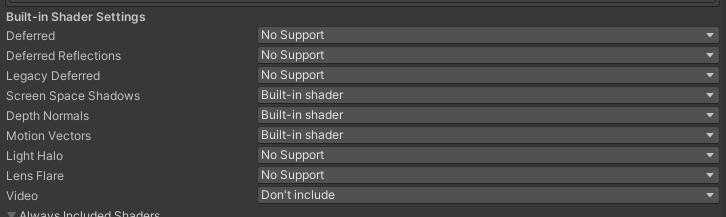
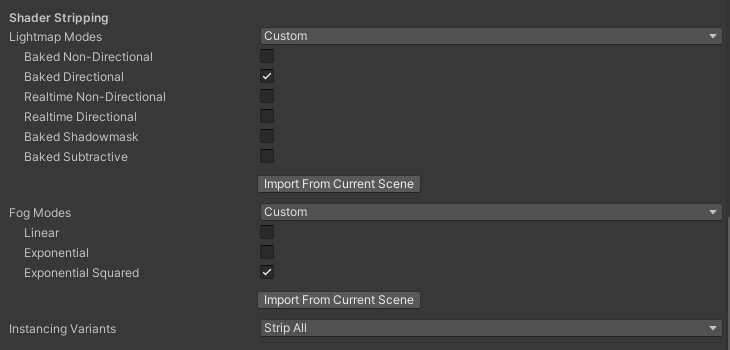
Graphics Settings⚓︎
The graphics tab in your project has various options here for enabling and disabling certain shader features, as well as reducing shader variants.
When a shader is compiled in Unity, if it makes use of #pragma multi_compile with various keywords, it will compile the same shader again but utilzing some of those specified macros in the shader.
If the shaders have alot of compiled keywords then you will have alot of shader variants. For some shaders the amount of variants can be small (around 100), but for some there can be a very large amount (around a 1000 or more) and this can take up a lot of space in your world file as these different shader variants have to be included.
You can disable most of these by disabling shader features in the graphics menu that aren't used in your world. Like the Player Settings section this will require experimentation but you can save up to 2 MB or more depending on your world.
Reducing Animation Data⚓︎
If your project is heavily dependent on animations, there are ways to reduce the amount of data animation clips can take.
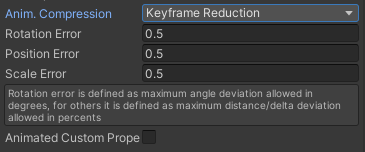
Animation Compression⚓︎
Unity presents options to compress animations when they are embeded in a mesh file that can support animation clips. Reducing the precision of position, rotational, and scale keyframes in an effort to reduce the data taken up by an animation clip.
For other animation clips, there are 3rd party tools that can intelligentlly reduce the amount of data in an animation clip.